事件驱动模型 实例
首先看一个我们在项目中基本都会涉及到的 实例 :用户注册。
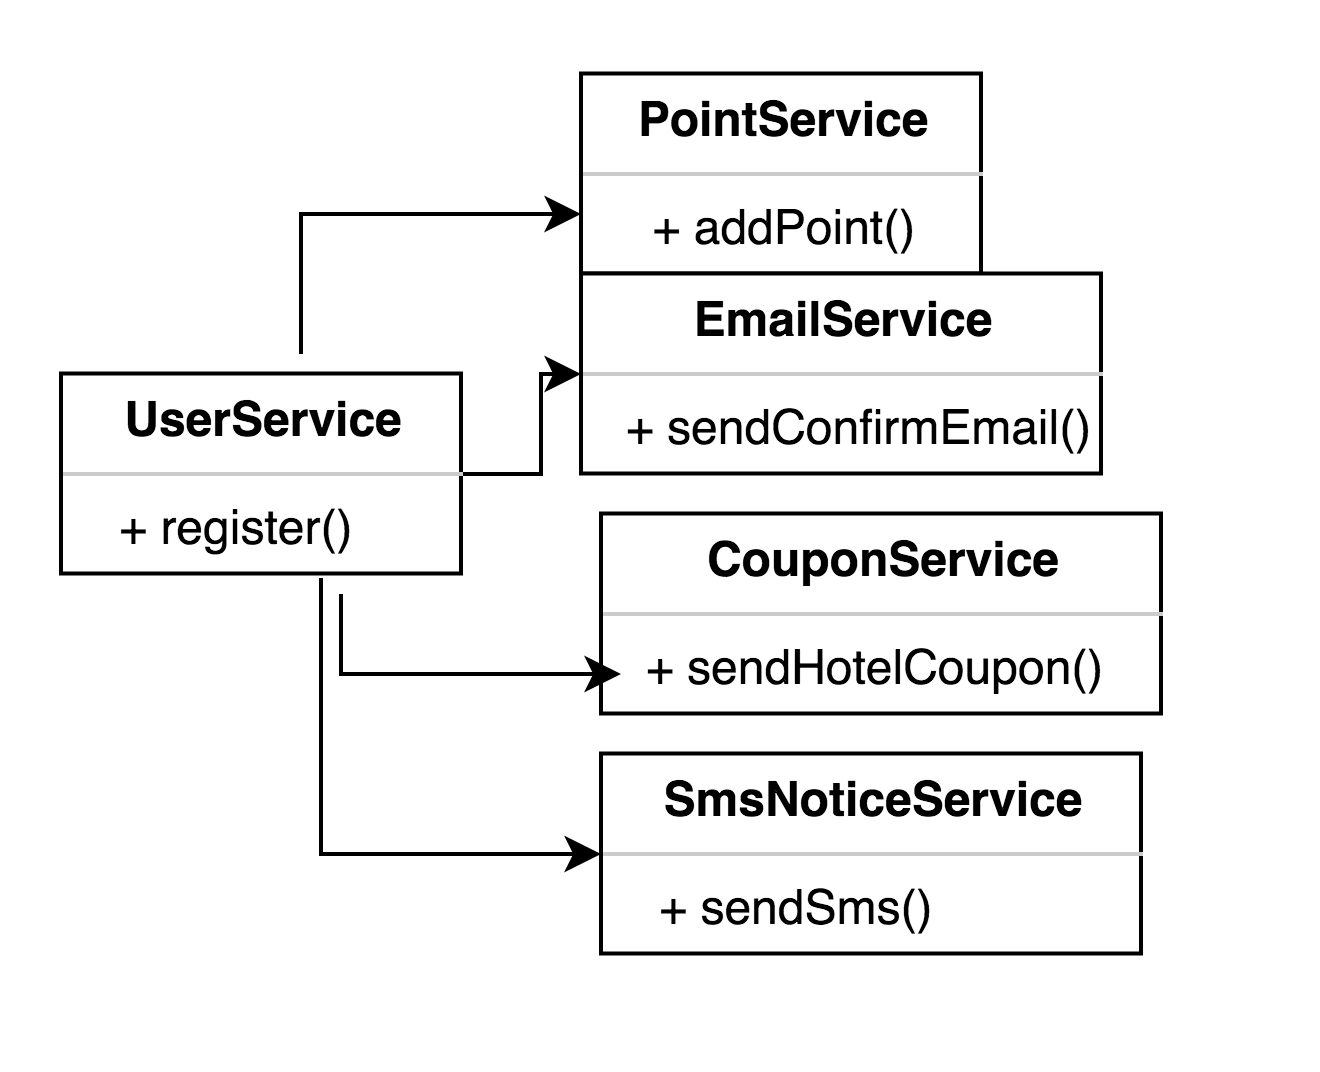
用户注册成功后,需要做的事情: 增加积分、发确认邮件、发送各种券、对用户数据进行索引等等……. 一般情况下会做如下设计:
那么这样的设计都存在哪些问题呢?
- UserService和 其他Service耦合严重,若想在增加功能或者删减功能 都比较麻烦;
- 有些功能可能需要调用第三方系统,如 增加积分、索引用户、发送短信,速度可能比较慢,此时需要异步支持;
从如上例子可以看出,应该使用一个观察者来解耦这些Service之间的依赖关系,如图: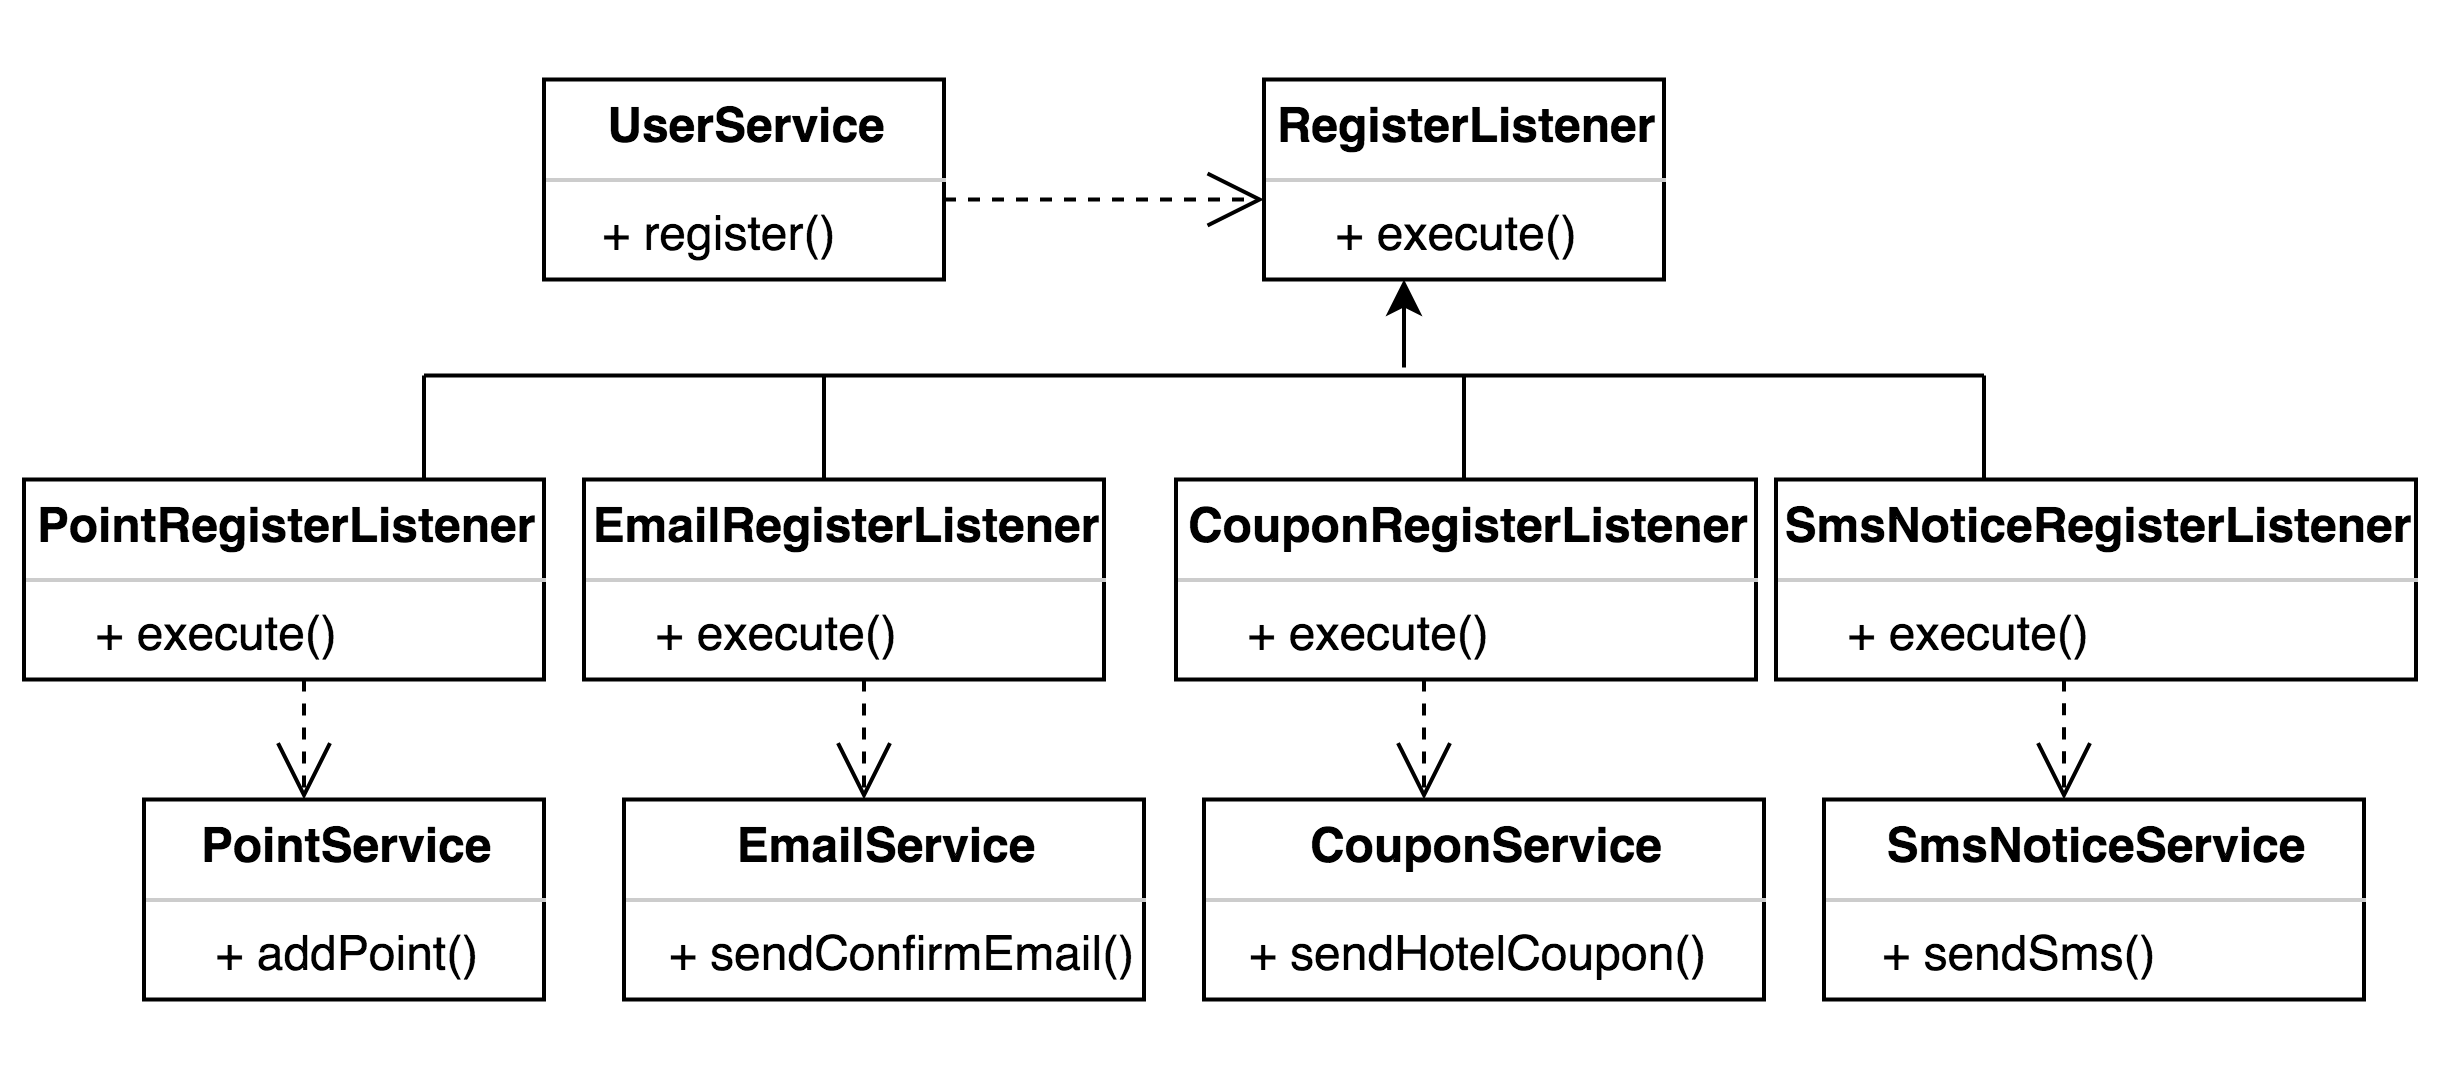
增加了一个
Listener来解耦UserService和其他服务,即注册成功后,只需要通知相关的监听器,不需要关系它们如何处理。增加功能或者删减功能都会变得非常容易。
这就是一个典型的事件处理模型或者叫发布/订阅模型或者观察者模式
通过
Listener解耦目标对象和它的依赖对象,目标只需要通知它的依赖对象,具体怎么处理,依赖对象自己决定。比如是异步还是同步,延迟还是非延迟等。这其中 既 使用了
DIP(依赖倒置原则,依赖于抽象,而不是具体 ) , 又使用了IoC思想,即以前主动去创建它依赖的Service,现在只是被动等待别人注册进来。主要目的就是:松散耦合对象间的一对多的依赖关系。
接下来设计模式之观察者模式。
观察者模式
- 观察者模式的定义
观察者模式又称为
发布/订阅模式或者事件驱动。其定义了一种一对多的依赖关系,让多个观察者对象同时监听某一个主题对象。这个主题对象在状态上发生变化时,会通知所有观察者对象,让它们能够自动更新自己。此种模式通常被用来实作事件处理系统。
- 观察者模式的组成
抽象主题角色 (Subject) :把所有对观察者对象的引用保存在一个集合中,每个抽象主题角色都可以有任意数量的观察者。抽象主题提供一个接口,可以增加和删除观察者角色。一般用一个抽象类和接口来实现。
抽象观察者角色 (Observer) :为所有具体的观察者定义一个接口,在得到主题的通知时更新自己。
具体主题角色 ( SubjectConcrete ):在具体主题内部状态改变时,给所有登记过的观察者发出通知。具体主题角色通常用一个子类实现。
具体观察者角色( ObserverConcrete ):该角色实现抽象观察者角色所要求的更新接口,以便使本身的状态与主题的状态相协调。通常用一个子类实现。如果需要,具体观察者角色可以保存一个指向具体主题角色的引用。
- 观察者模式的好处
观察者模式 将 观察者 和 被观察的对象 分离开。观察者和被观察者之间存在“观察”的逻辑关联,当被观察者发生改变的时候,观察者就会观察到这样的变化,并且做出相应的响应。
举个例子,支付中心 可以作为一个观察者,业务数据的状态 是被观察者,当业务数据的状态 发生变化后,就会告知支付中心作出相应的 动作。
面向对象设计的一个原则是:系统中的每个类将重点放在某一个功能上,而不是其他方面。一个对象只做一件事情,并且将他做好。观察者模式在模块之间划定了清晰的界限,提高了应用程序的可维护性和重用性。
观察者模式示例
对上述角色进行抽象,类图如下:
|
|
|
|
|
|
|
|
|
|
Main 方法运行
运行结果:
接下来我们看看jdk中的观察者模式。
JDK中 观察者模式的实现及简单应用
- JDK 中观察者模式通过 Observer接口和Observable类实现。具体源码如下123456package java.util;// 观察者,public interface Observer {// 只要改变了 observable 对象就调用此方法。void update(Observable o, Object arg);}
|
|
- 应用
Java实现了Observer,我们需要做的是:
- 被观察的
Subject对象继承java.util.Observerable - 需要观察的对象实现
java.util.Observer接口 - 用
java.util.Observerable的addObserver(Observer obj)方法把Observer注册到Subject对象中。 - 这已经完成了大部分的工作了。然后手动调用
setChanged()方法后,再调用notifyObservers()方法,就可以实现Observer模式。
|
|
|
|
|
|
运行结果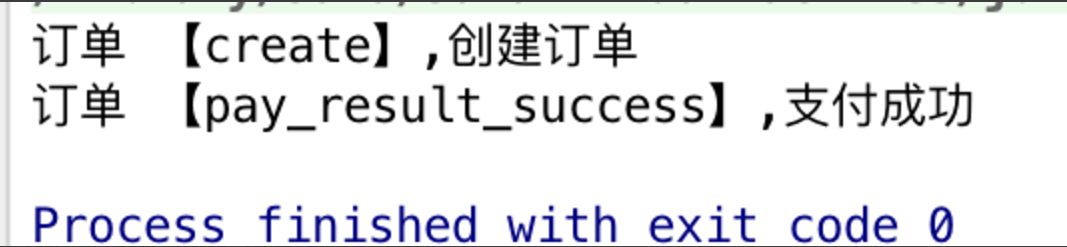
- 优缺点
JDK中并没有把这两个部分都设计为接口,而是让类
java.util.Observerable提供了部分的实现,简化了许多编程的工作。但是这也导致Observable类的扩展性不高,缺乏灵活性,不如自己实现的观察者模式灵活。
notifyObservers方法 首先检查那个内部的标志,以判断状态是否改变,如果是的话,它会调用注册在Subject中的每个Observer的update()方法。
在JDK中这个方法内部是作为synchronized来实现的,也就是如果发生多个线程同时争用一个java.util.Observerable的notifyObservers()方法的话,他们必须按调度的等待着顺序执行。
在某些特殊的情况下,这会有一些潜在的问题:可能在等待的过程中,一个刚刚被加入的Observer会被遗漏没有被通知到,而一个刚刚被删除了的Observer会仍然收到它已经不想要了的通知。
JavaBean规范的事件驱动模型/观察者
JavaBean规范提供了JavaBean的PropertyEditorSupport及PropertyChangeSupport支持。PropertyEditorSupport和PropertyChangeSupport就是被观察者,而PropertyChangeListener就是 观察者。
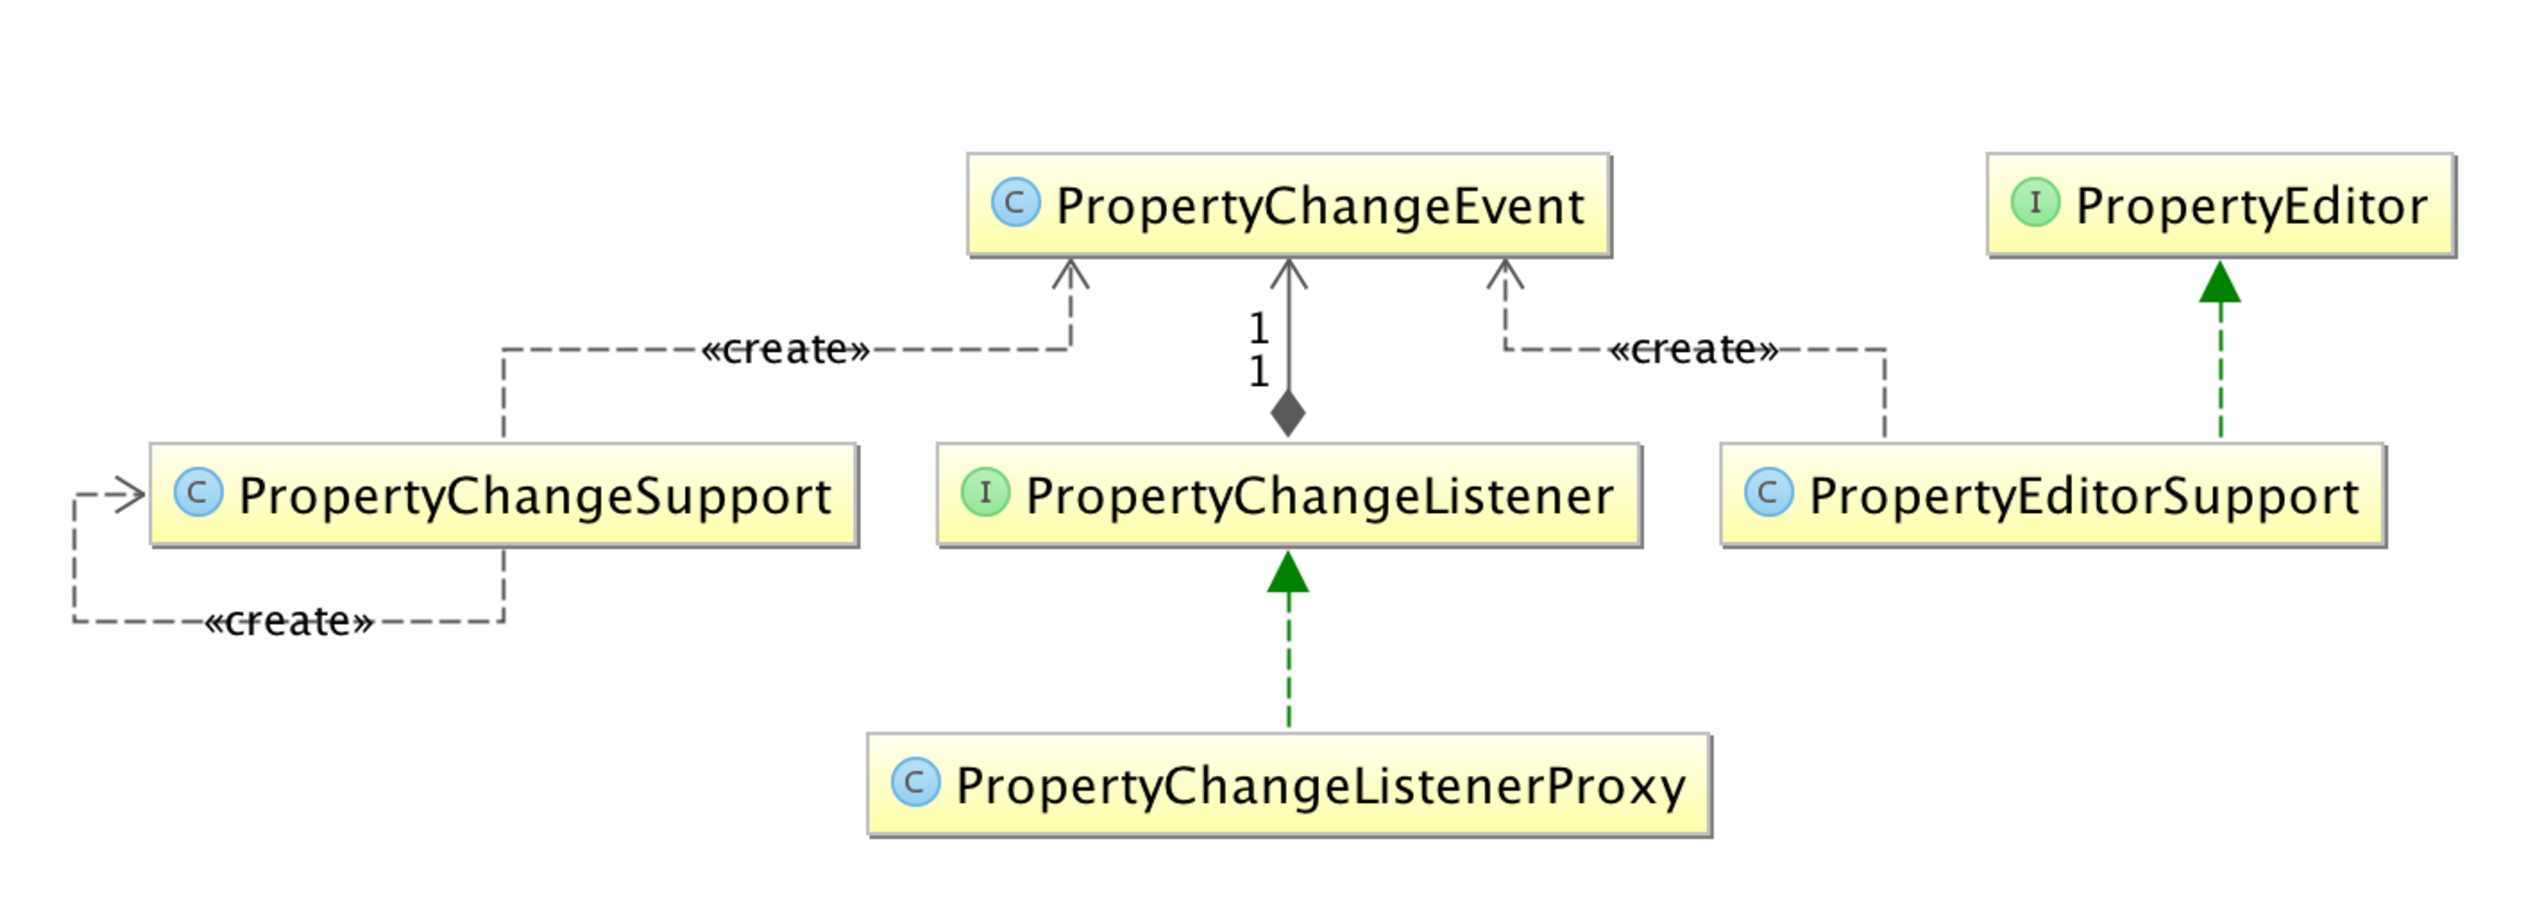
具体实现自行研究,实例如下
|
|
Spring 事件驱动模型
- 首先来看一下
Spring的事件驱动模型图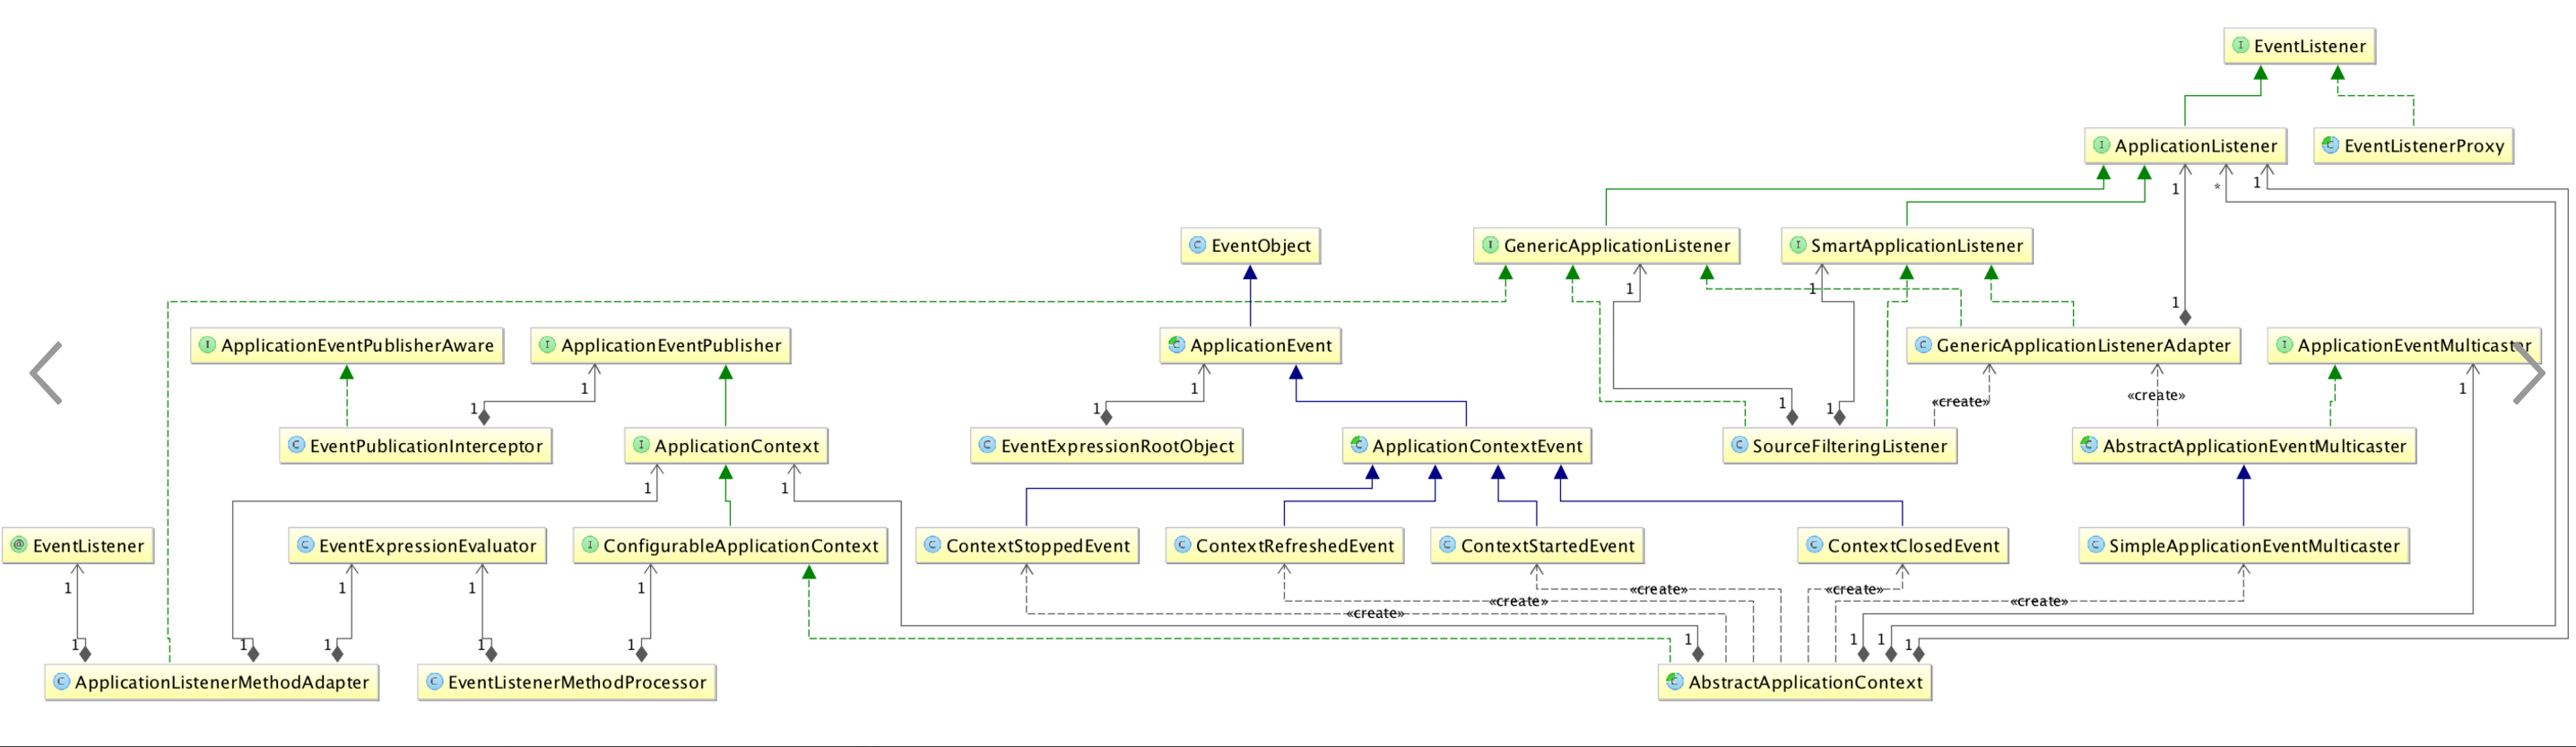
事件ApplicationEvent
继承自
JDK的EventObject,JDK要求所有事件将继承它,并通过source得到事件源,比如我们的AWT事件体系也是继承自它;
系统默认提供了如下
ApplicationEvent事件实现:
只有一个ApplicationContextEvent,表示ApplicationContext容器事件,且其又有如下实现:
ContextStartedEvent:ApplicationContext启动后触发的事件ContextStoppedEvent:ApplicationContext停止后触发的事件ContextRefreshedEvent:ApplicationContext初始化或刷新完成后触发的事件;(容器初始化完成后调用)ContextClosedEvent:ApplicationContext关闭后触发的事件;(如web容器关闭时自动会触发spring容器的关闭,如果是普通java应用,需要调用ctx.registerShutdownHook(); 注册虚拟机关闭时的钩子才行 )org.springframework.context.support.AbstractApplicationContext抽象类实现了LifeCycle的start和stop回调并发布ContextStartedEvent和ContextStoppedEvent事件;但是无任何实现调用它,所以目前无任何作用。
事件发布者:ApplicationEventPublisher及ApplicationEventMulticaster
系统默认提供了如下实现
ApplicationContext接口继承了ApplicationEventPublisher,并在AbstractApplicationContext实现了具体代码,实际执行是委托给ApplicationEventMulticaster(可以认为是多播)。- 我们常用的
ApplicationContext都继承自AbstractApplicationContext,如ClassPathXmlApplicationContext、XmlWebApplicationContext等。所以自动拥有这个功能。- 所以我们发送事件只需要通过
ApplicationContext.publishEvent即可,没必要再创建自己的实现了。除非有必要。
事件监听者 : ApplicationListener
- 其继承自
JDK的EventListener,JDK要求所有监听器将继承它,比如我们的AWT事件体系也是继承自它;ApplicationListener接口:
可以看到其 只提供了 onApplicationEvent 方法,我们需要在该方法实现内部判断事件类型来处理,也没有提供按顺序触发监听器的语义,所以Spring提供了另一个接口,SmartApplicationListener:
该接口可方便实现去判断支持的事件类型、目标类型,及执行顺序。
#六、Spring事件驱动模型实现原理
以下分析基于spring-4.2.5...
refresh()方法体内部 重点关注以下方法的调用:
- prepareRefresh() 初始化 earlyApplicationEvents,其保存较早的ApplicationEvent 事件,一旦广播组件可用,这些事件就会通过广播组件 触发监听器执行 onApplicationEvent() 方法。
*initApplicationEventMulticaster() 初始化事件广播组件。registerListeners() 添加 实现了 ApplicationListener 的事件监听器,以及发布早期的 ApplicationEvent。
在调用 publishEvent()方法时,如果 onApplicationEvent 为空,就会立即触发通知,否则 会将 事件 添加到 earlyApplicationEvents 中。
|
|
事件广播器类图如下: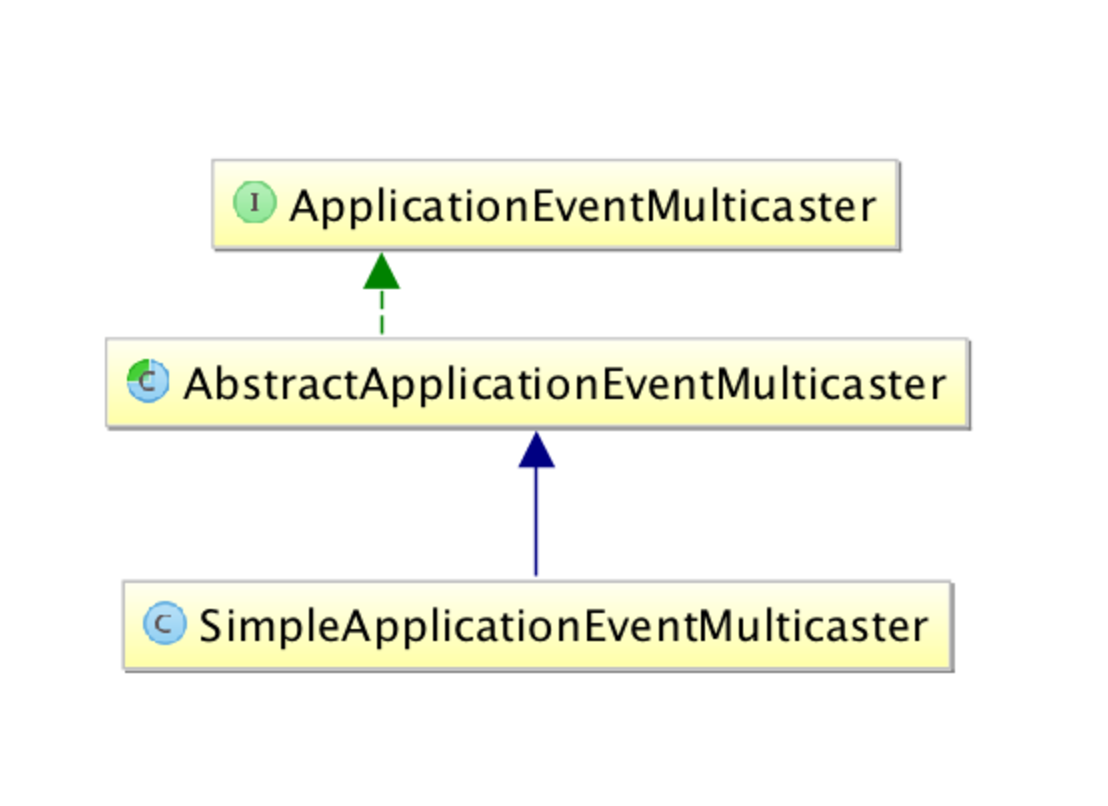
ApplicationEventMulticaster 类定义了 事件广播接口。
AbstractApplicationEventMulticaster 抽象类 实现了事件监听器的注册。
SimpleApplicationEventMulticaster在 AbstractApplicationEventMulticaster 的基础上实现了时间通知。 multicastEvent()方法会循环 所有的事件监听器,然后 通过 invokeListener() 方法 完成所有事件的广播通知并执行相应事件监听器的onApplicationEvent()方法。
#七、Spring事件驱动模型实例的实现
以上述一中的示例进行实现如下:
定义实体类User
12345678910111213141516171819202122package com.event.register;import java.io.Serializable;public class User implements Serializable {private String username;private String password;public User(final String username, final String password) {this.username = username;this.password = password;}public String getUsername() {return username;}public void setUsername(final String username) {this.username = username;}public String getPassword() {return password;}public void setPassword(final String password) {this.password = password;}}定义注册事件 RegisterEvent
1234567package com.event.register;import org.springframework.context.ApplicationEvent;public class RegisterEvent extends ApplicationEvent {public RegisterEvent(User user) {super(user);}}对注册事件实现监听
1234567891011121314151617181920package com.event.register;import org.springframework.context.ApplicationEvent;import org.springframework.context.event.SmartApplicationListener;import org.springframework.stereotype.Component;public class SmsNoticeRegisterListener implements SmartApplicationListener {public boolean supportsEventType(Class<? extends ApplicationEvent> event) {return event == RegisterEvent.class;}public boolean supportsSourceType(Class<?> aClass) {return aClass == User.class;}public void onApplicationEvent(ApplicationEvent applicationEvent) {System.out.println("注册成功,发送短信通知用户 : " + ((User)applicationEvent.getSource()).getUsername());}public int getOrder() {return 1;}}
|
|
- 发布注册事件123456789101112131415161718192021222324252627282930313233package com.event.register;import org.springframework.beans.factory.annotation.Autowired;import org.springframework.context.ApplicationContext;import org.springframework.stereotype.Service;@Servicepublic class RegisterService {@Autowiredprivate ApplicationContext applicationContext;public void register(String username, String password) {System.out.println(username + "注册成功!");publishRegisterEvent(new User(username, password));}private void publishRegisterEvent(User user) {applicationContext.publishEvent(new RegisterEvent(user));}}``````java<?xml version="1.0" encoding="UTF-8"?><beans xmlns="http://www.springframework.org/schema/beans"xmlns:xsi="http://www.w3.org/2001/XMLSchema-instance"xmlns:context="http://www.springframework.org/schema/context"xmlns:aop="http://www.springframework.org/schema/aop"xmlns:task="http://www.springframework.org/schema/task"xsi:schemaLocation="http://www.springframework.org/schema/beans http://www.springframework.org/schema/beans/spring-beans.xsdhttp://www.springframework.org/schema/aop http://www.springframework.org/schema/aop/spring-aop.xsdhttp://www.springframework.org/schema/task http://www.springframework.org/schema/task/spring-task.xsdhttp://www.springframework.org/schema/context http://www.springframework.org/schema/context/spring-context.xsd" default-lazy-init="true"><context:component-scan base-package="com.event"/><!-- 开启@AspectJ AOP代理 --><aop:aspectj-autoproxy proxy-target-class="true"/></beans>
|
|